
VERSIONE IN INGLESE IN FONDO (ENGLISH VERSION AT THE BOTTOM)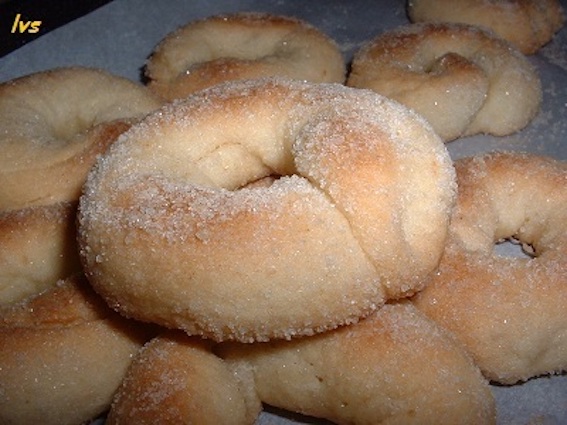
Queste ciambelline me le regalava una mia amica di Palestrina (sono famosissime a Roma, nei Castelli Romani e dintorni), nei saltuari incontri che rubavamo alle nostre famiglie, magari per dedicarci ad una passeggiata al centro di Roma, oppure ad una visita ad un museo. Lei arrivava sempre con un vassoio di queste delizie e, quando la sera tornavo a casa, si faceva festa perché erano arrivate le “ciambelline di Carla”.
Ora la mia amica è diventata nonna, è più indaffarata che mai, ci vediamo meno spesso, e le ciambelline me le faccio da me, seguendo più o meno la sua antica ricetta.
Però, oltre ai bicchieri come dosatori, con un po’ di lavorìo sono riuscita a ricavare anche le dosi in grammi. Lo trovo utile qualora volessi verificare le percentuali di zuccheri o grassi della ricetta!
 Partiamo con i miei bicchieri colmi colmi per due teglie da forno 43 x 32, per circa 70 ciambelline da 20 gr l’una (ma naturalmente potrete diminuire le dosi, utilizzando vasetti di yogurt o tazzine da caffè):
1 bicchiere di vino bianco secco* (se si usa il frizzante si potrebbe omettere il lievito) – in alternativa vino rosso, ma verranno ciambelline più scure – 230 g
1 bicchiere di olio e.v.o. – 220 g (noi preferiamo così, ma se volete potete mettere olio di girasole deodorato o di arachide, più delicati di sapore e gli unici con un punto di fumo alto simile all’olio e.v.o.)
1 bicchiere zucchero di canna bio – 230 g (o zucchero semolato)
5 bicchieri di farina 00 bio debole per biscotti (o meglio 4 bicchieri di farina + 1 di maizena) – 675 g (135 x 5)
4 cucchiaini di semi di finocchio o di anice – 10 g (facoltativi – io li ho polverizzati nel macinino, perchè non tutti li vogliono fra i denti)
1 piccolo cucchiaino di lievito per dolci autoprodotto – 4,8 g (fatto solo con cremor tartaro e bicarbonato – equivalente a mezza bustina – molti lo evitano, specialmente se si usa vino frizzante o spumante brut)
1 pizzico di sale
60 g zucchero di canna per immergere i cordoncini crudi per un aspetto più rustico.
* … e se vorrete far mangiare queste ottime ciambelline anche ai vostri nipotini di pochi anni, sarà possibile provarle con questo ottimo vino dealcolato fermo, o con le bollicine 😉


Procedimento
Direttamente sulla tavola (oppure in una terrina, o nell’impastatrice) ho mescolato tutti gli ingredienti tranne 1 bicchiere di farina e il lievito.
Finito di amalgamare gli ingredienti ho aggiunto il lievito (se ho deciso di metterlo) setacciato insieme al 5° bicchiere di farina (se non metto lievito, metterò da subito tutti i 5 bicchieri di farina/amido).
Ho terminato di lavorare la palla.
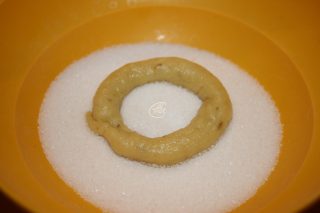
Nel frattempo ho preparato una ciotola con dello zucchero per immergere le ciambelline crude (dal conteggio finale è risultato che ho usato 60 grammi).
Con l’impasto utile per una teglia, pronto davanti a me (e coperto da cellophane), ho staccato tanti pezzi e ho formato tanti cordoncini appena abbozzati del peso di circa 20 grammi ciascuno.
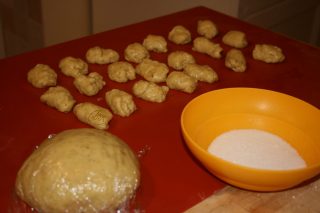
Ho rotolato ciascun pezzetto di impasto fra le mani, simulando l’azione di quando le sfreghiamo perché abbiamo freddo.
Ho adagiato questi rotolini grossolani in successione sullo spiano, in modo che alla fine della lavorazione potessi ricominciare dal primo.
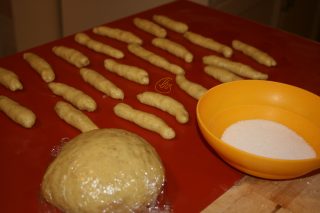
Ora non ho fatto altro che portare alla dimensione di circa 15 cm ciascun cordoncino per formare le ciambelline e chiuderlo sovrapponendo i lembi (se si vogliono ciambelline più sottili si potranno fare cordoncini fino a 18-20 cm di lunghezza, ma fare attenzione alla cottura, cuoceranno più velocemente) .
Grazie alla farina debole e a questo riposo i rotolini non opporranno resistenza, saranno più gestibili e l’impasto non si sfalderà.
Un ulteriore metodo che ho scoperto per non far sfaldare l’impasto (soprattutto se non si utilizza amido):


invece di poggiare le mani sulla tavola perpendicolari al cordoncino, le muovo avanti e indietro tenendole parallele a questo. Non so perché, ma funziona!
Ho quindi immerso da una sola parte ogni ciambella nello zucchero, premendo delicatamente per farlo aderire, e le ho adagiate nella teglia con la parte zuccherata rivolta in alto, distanziandole leggermente.
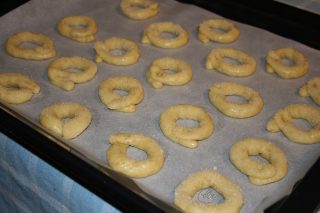
Ho infornato a 180°C funzione statica per 25 minuti circa, binario centrale, ruotando la teglia dopo 20 minuti, e alzando di un binario (così si coloriranno anche sopra).
Ho cotto una teglia alla volta, ma se fate dose intera e volete cuocere le due teglie insieme, consiglio di usare il ventilato e abbassare a 160°C, cambiando posizione alle teglie a metà cottura, e ruotandole.

Saranno cotte quando saranno dorate, ma attenzione, bruciano velocemente!

Sopra, più paffutelle di quelle della mia amica,
sotto, più fine; deliziose in entrambi i casi!

°°°°°°°°°°°°
Una bella variante molto simile a quelle realizzate da Claudia!
Se non si fanno le ciambelline, ma si vogliono dare forme più spesse come questa sotto, occorrerà fare cordoncini più sottili, altrimenti non si cuoceranno bene o saranno meno friabili.


***************
ENGLISH RECIPE
These donuts were a gift of a friend of mine of Palestrina (they are very famous in Rome, in the Castelli Romani area), in the occasional meetings that we stole from our families, maybe to dedicate ourselves to a walk in the center of Rome, or for a visit to a museum. She always came with a tray of these delights and, when I came home in the evening, it was a party because the “Carla donuts” had arrived.
Now my friend has become a grandmother, she is busier than ever, we see each other less often, and I prepare the donuts by myself, following more or less her ancient recipe.
However, in addition to the glasses as dosers, with a little work I managed to get even the doses in grams. I find it useful if I want to check the percentage of sugars or fats in the recipe!
Let’s start with my glasses filled for two baking trays 43 x 32, and about 70 donuts of 20 gr each (but of course you can reduce the doses, using jars of yogurt or coffee cups):
1 glass of dry white wine (if you use the sparkling you could omit the yeast) – alternatively red wine, but darker donuts will come – 230 g
1 glass of oil e.v.o. – 220 g (we prefer it so, but if you want you can put deodorized sunflower oil or peanut oil, more delicate flavor and the only ones with a high smoke point similar to the oil e.v.o.)
1 glass organic brown sugar – 230 g (or granulated sugar)
5 glasses of flour 00 bio weak for biscuits (or better 4 glasses of flour + 1 of cornstarch) – 675 g (135 x 5)
4 teaspoons of fennel seeds or aniseed – 10 g (optional – I sprayed them in the grinder, because not everyone wants them between their teeth)
1 teaspoon of my baking powder – 4,8 g (half a bag-like, but many avoid it, especially if you use sparkling wine or “spumante brut”)
1 pinch of salt
60 gr brown sugar to dip the raw cords for a more rustic look
Method
Directly on the table (or in a bowl, or kneader) I mixed all the ingredients except 1 glass of flour and baking powder.
After mixing the ingredients I added the yeast (if I decided to put it) together with the 5th glass of flour (if I do not put yeast, I will immediately put all 5 glasses of flour / starch).
I finished working the dough.
I prepared a bowl with sugar to dip the raw donuts (from the final count it turned out I used 60 grams).
With the dough useful for a pan, ready in front of me (and covered by cellophane), I detached many pieces of 20 gr each.
I rolled each piece of dough in my hands, simulating the action of when we rub it because we are cold.
I placed these coarse rolls in succession on the spiano, so that at the end of the pieces processing I could start again from the first one.
Now I have done nothing but bring to the size of about 15 cm each cord to form the donuts and close it by overlapping the flaps.
Thanks to the weak flour and to this rest the rolls will not resist, they will be more manageable and the dough will not fall out (but up to 18-20 cm in length are fine if you want thinner donuts. In this case pay attention. The donuts could burn).
A further method that I have discovered to avoid breaking up the dough:
instead of resting your hands on the table perpendicular to the cord, I move them back and forth keeping them parallel to this. I do not know why, but it works!
So I dipped each donut in sugar, pressing gently to make it adhere, and I placed them in the pan with the sugared side up, slightly apart.
I bake at 180 ° C static function for about 25 minutes, central track, turning the pan after 20 minutes, and raising a track (so they will also color above).
I cooked a pan at a time, but if you make a full dose and you want to cook the two pans together, I recommend using the ventilated and lower to 160 °C, changing position to the trays, and rotating halfway through cooking.
They will be cooked when they are golden, but beware, they burn quickly!
Above, more plump of those of my friend,
below, finer; delicious in both cases!
°°°°°°°°°°°°
A nice variation very similar to those made by Claudia!
If you do not make the donuts, but you want to give thicker shapes like this below, you will need to make thinner cords, otherwise they will not cook well or they will be less crumbly.
Fonte 24.IV.2010